Bomber Command had set out a detailed plan of how Düsseldorf was to be bombed in the early hours of 26th May 1943.
Zero Hour was set at 01.30, and the bombing was expected to continue until 02.25
Early in the war, the RAF sent bombers by individual routes to the target which made them vulnerable as they passed through the Kammhuber Line of flak batteries associated with German night fighters receiving ground-directed guidance. To try to overwhelm the defences, Bomber Command adopted the tactic of sending all the aircraft in a tight 'bomber stream' through the fewest cells as possible of the Kammhuber Line.
By using a statistical approach comparing the chances of collisions in a tight stream to the chances of being lost to night fighters or flak, the RAF arrived at what they hoped was the optimal distance of bomber separation.
For the Düsseldorf Raid, the bombers would be flying in a bomber stream 8 to 10 miles wide with a depth of around 6000ft (roughly 16,000ft to 22,000ft).
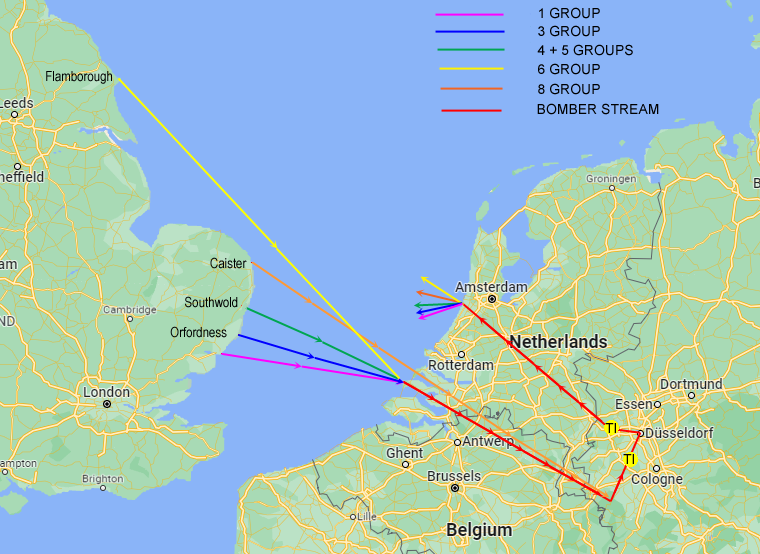
Aircraft from the Pathfinder Force Group 8 would lead the way, while bombers from Groups 1,3,4,5 and 6 converged on the Dutch coast at Zeeland. before flying southeast until they crossed the German border 10 miles (16km) north of Aachen and making a sharp 90° left turn to approach Düsseldorf from the southwest.
As an aid to navigation en route to the target, yellow Target Indicators (TIs) were to be dropped at 51° 00’ N. 06° 34’ E. near the town of Bedburg halfway between Aachen and Düsseldorf by 10 Mosquitoes equipped with
Oboe navigational guidance systems. This marking was to be maintained throughout the attack by 23 Lancaster 'backers up'.
Ground-marking of the aiming-point with red TIs was to be carried out by the Oboe Mosquitoes between 01.28 and 02.20, and with green TIs by 13 backers-up. Unlike 'Sky Marking' with TIs on parachutes, ground-marking involves the pyrotechnic bombs igniting on their way to the ground, giving a visual aiming point for the following bombers. A barometric fuse detonates the ground marker TIs at between 2,600 and 16,000 feet (800 to 5000 metres), releasing dozens of flares which fall to the ground and burn out in about three to four minutes. Between 01.32 and 01.50, 18 backers-up were to aim their green TIs at red if visible, but otherwise at the estimated centre of all green TIs seen. After 01.50, the remaining 25 backers-up were to aim so as to overshoot by 5 seconds. This was to overcome the tendency of 'creepback' when crew would release their bombs slightly early, with the result that the bomb pattern crept backwards from the original aiming point.
The main force crews were instructed to aim exactly at red TIs if visible, otherwise at the estimated centre of all green TIs seen.
The more experienced crews (about 250) of all Groups were selected to attack in the first wave of the main force, the Lancasters carrying mixed loads and being over the target early in this phase. Wellingtons and Stirlings were to carry pure incendiary loads.
The second wave was to consist of the remaining Halifaxes, Stirlings and Wellingtons carrying incendiaries and High Explosive (H.E.) bombs.
The remaining Lancasters were to complete the attack, carrying mixed loads, except for 50 of the aircraft of 115 Sq. and 4 of 61 Sq. which were each to carry 1 x 8000lb. (3.6 imperial ton, 4.0 US ton) H.E.
The 1000lb, 2000lb and 4000lb bombs were designed to cause blast damage and blow out windows and roofs so that the incendiaries could start fires inside the damaged buildings. Scattered among the standard 1000lb bombs, there were to be a number of 1000lb GP LD (long delay) bombs, whose fuses could be set to detonate the bomb up to seven days after it was dropped. These were intended to kill rescuers or firemen who were responding to the initial bombing raid, but also damage any repair work that had been carried out in the interim, a brutal tactic that had also been employed by the Luftwaffe during the Blitz.
On the return route, 18 aircraft (Practice Y type) were to drop yellow TIs at 51° 17’ N. 06° 30’ E., halfway between the major cities of Mönchengladbach and Krefeld with a view to helping main force aircraft to avoid heavily defended areas after leaving the target. The Practice Y (or Nav Aid Y) type aircraft were to carry the brand new ground scanning radar system called
H2S which had only been introduced into service a couple of months earlier. H2S gave a very crude image on a cathode ray tube which could identify landmarks such as rivers and built-up areas, but had the advantage that it was unaffected by cloud cover and did not rely on signals from Britain for locational guidance.
All aircraft were to return on a northwesterly course and cross the Dutch coast between Rotterdam and Amsterdam near Noordwijk, before dispersing to return to their home bases.
Between 01.00 and 02.30, the
Gee Eastern Chain was to be available on two frequencies. Gee provided navigational assistance to non-Oboe or H2S equipped aircraft, and the Eastern Chain master station was located in Daventry, Northamptonshire with slave stations at Clee Hill in Shropshire, Stenigot in Lincolnshire and Gibbet Hill in Surrey.

